NxVET support

NxSCOPE guidePair, record, sync and calibrate.

Set up NxSCOPE on your phone or computer, update its firmware, record and sync your measurements, and calibrate a new device. Can't find your answer? Our team is happy to help.

Older device

NxSCOPE: get started

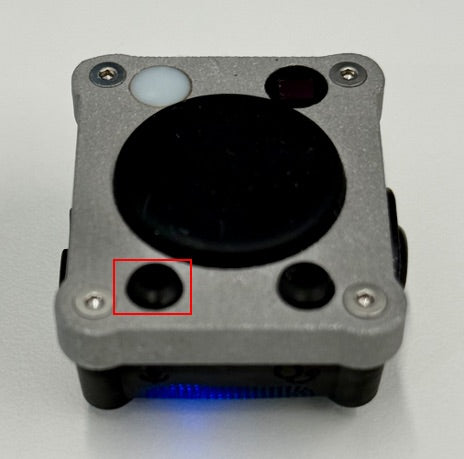
NxSCOPE clips onto your stethoscope. One button records voice notes, the other takes vitals (temperature, heart rate, respiratory rate). Set it up in the NxVET phone app or on a computer at app.nx.vet.

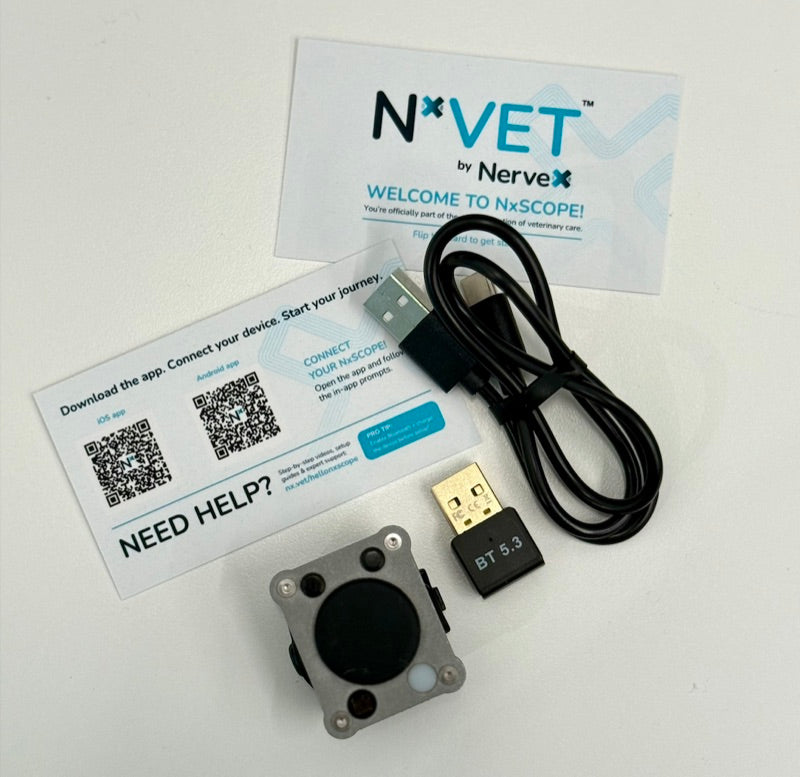
NxSCOPE device with its USB charging cable, Bluetooth dongle and Get Started card
What's in the box.
  • In the box

    NxSCOPE device, USB charging cable, optional Bluetooth dongle, and a Get Started card with a QR code to the welcome page and the app links.

  • Charge it first

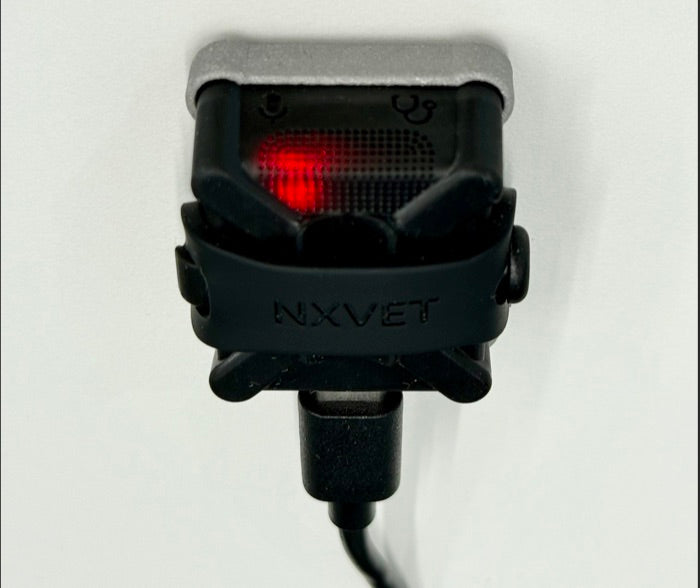
    Charge NxSCOPE for at least 2 hours. A red light is on while it charges.

  • Phone or computer

    Install the NxVET app (iOS, Android) or use app.nx.vet. A computer without Bluetooth needs the USB dongle.

NxSCOPE plugged into its USB cable with the red charging light on
The red light shows it's charging.

Pair NxSCOPE and update the firmware

Update the firmware once when you first pair the device, then clear any old data and check its status. Keep the app open during the update.

Phone app: swipe or use the arrows.

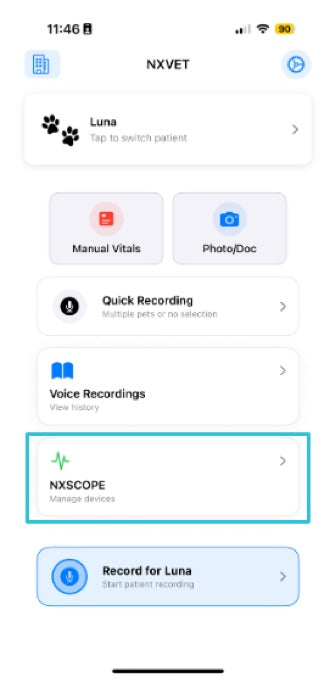
  1. Screenshot of the NxVET app: open NxSCOPEStep 1

    Open NxSCOPE

    Open the NxVET app and tap NxSCOPE.

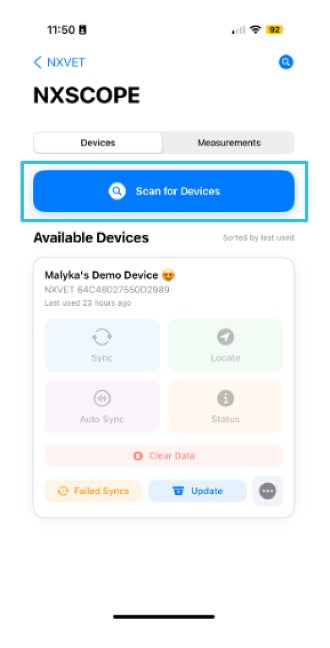
  2. Screenshot of the NxVET app: scan for devicesStep 2

    Scan for devices

    Tap Scan for Devices and pick your NxSCOPE.

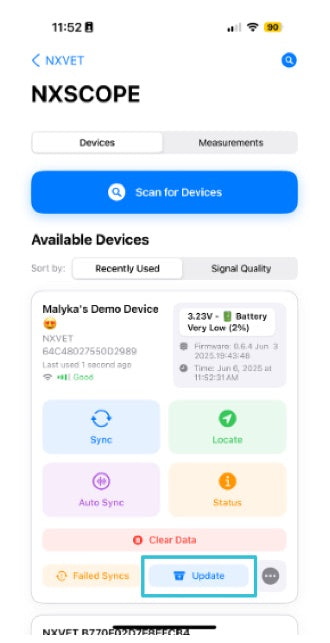
  3. Screenshot of the NxVET app: tap UpdateStep 3

    Tap Update

    On your device card, tap Update.

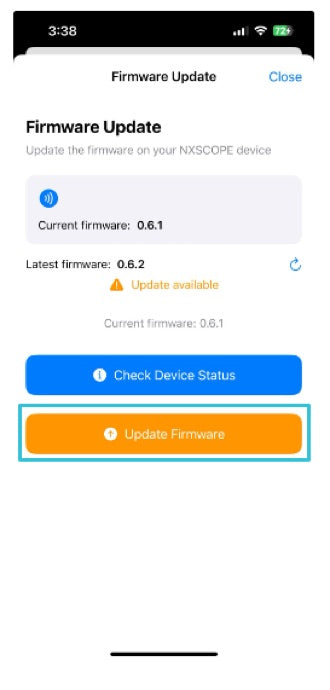
  4. Screenshot of the NxVET app: update the firmwareStep 4

    Update the firmware

    Tap Update Firmware.

  5. Screenshot of the NxVET app: stay on this screenStep 5

    Stay on this screen

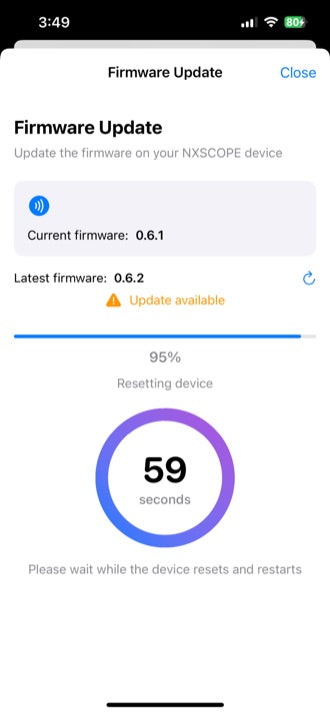
    Don't switch apps while the firmware downloads. It takes a couple of minutes.

  6. Screenshot of the NxVET app: update doneStep 6

    Update done

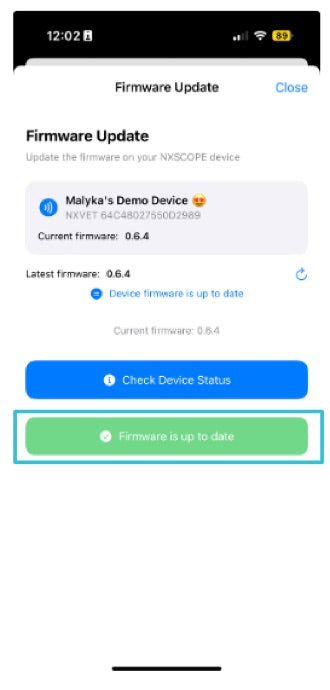
    When the timer reaches 0, the update is done and NxSCOPE reboots.

  7. Screenshot of the NxVET app: clear old dataStep 7

    Clear old data

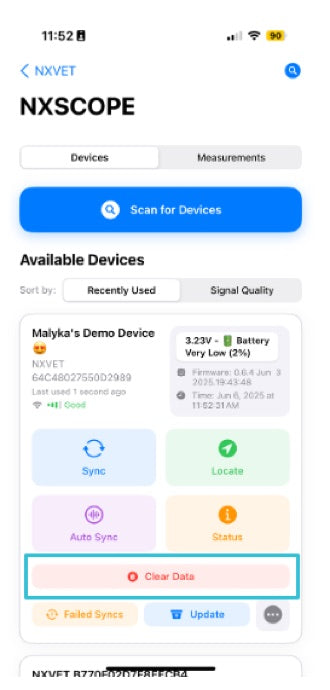
    Tap Clear Data to wipe any recordings already on the device.

  8. Screenshot of the NxVET app: confirmStep 8

    Confirm

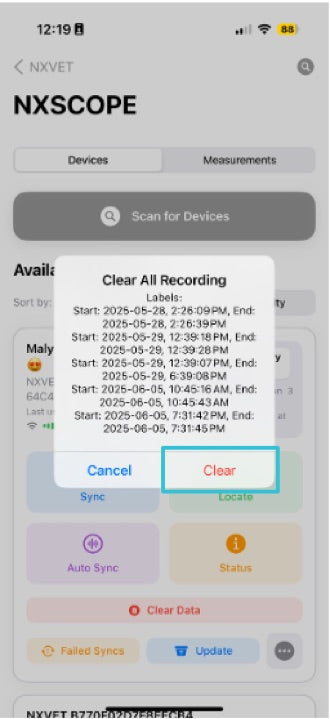
    Tap Clear to confirm.

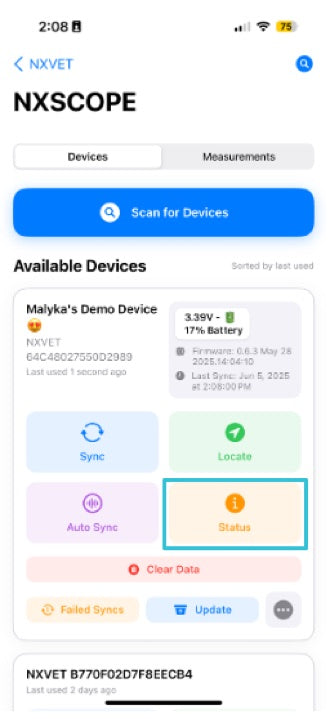
  9. Screenshot of the NxVET app: check the statusStep 9

    Check the status

    Tap Status before your first measurement. You're ready to record.

On a computer

app.nx.vet
  1. Go to app.nx.vet. No Bluetooth built in? Plug in the dongle first (Windows may install drivers on its own).
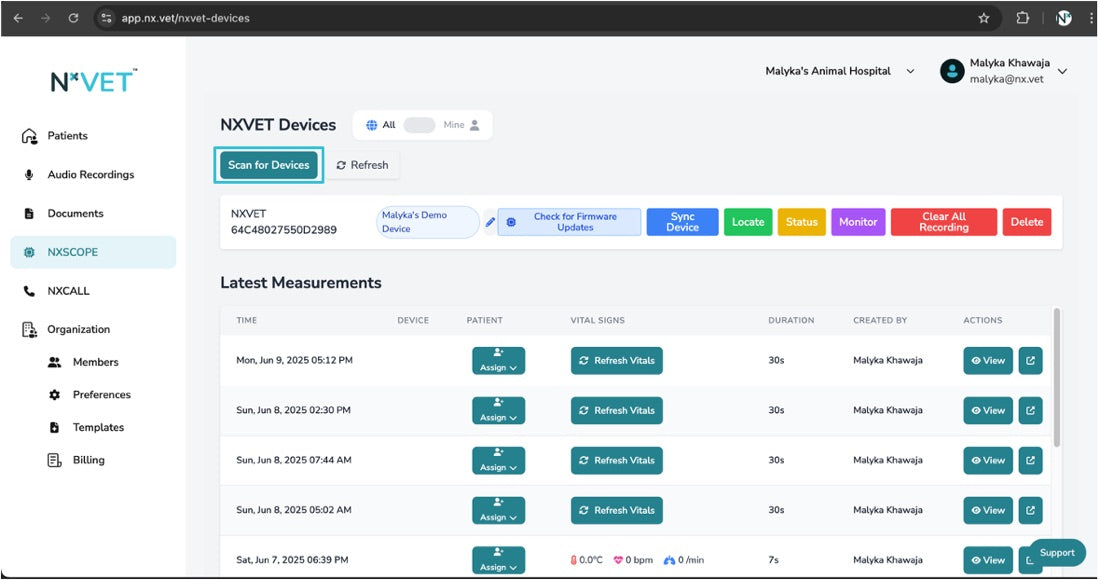
  2. Click NXSCOPE, or go to the Devices page, and click Scan for Devices.
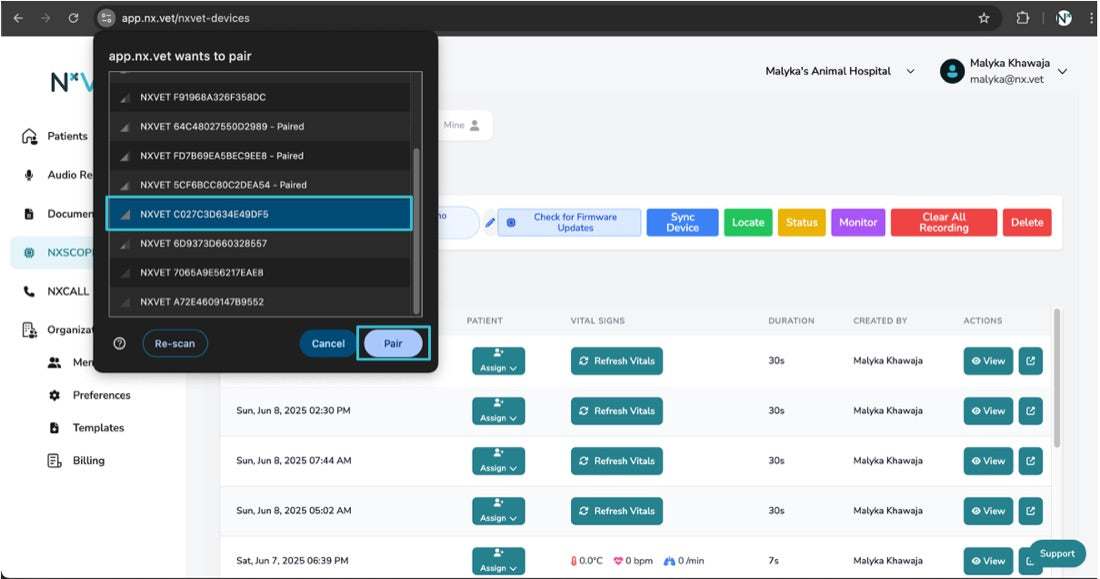
  3. Choose your device and click Pair.
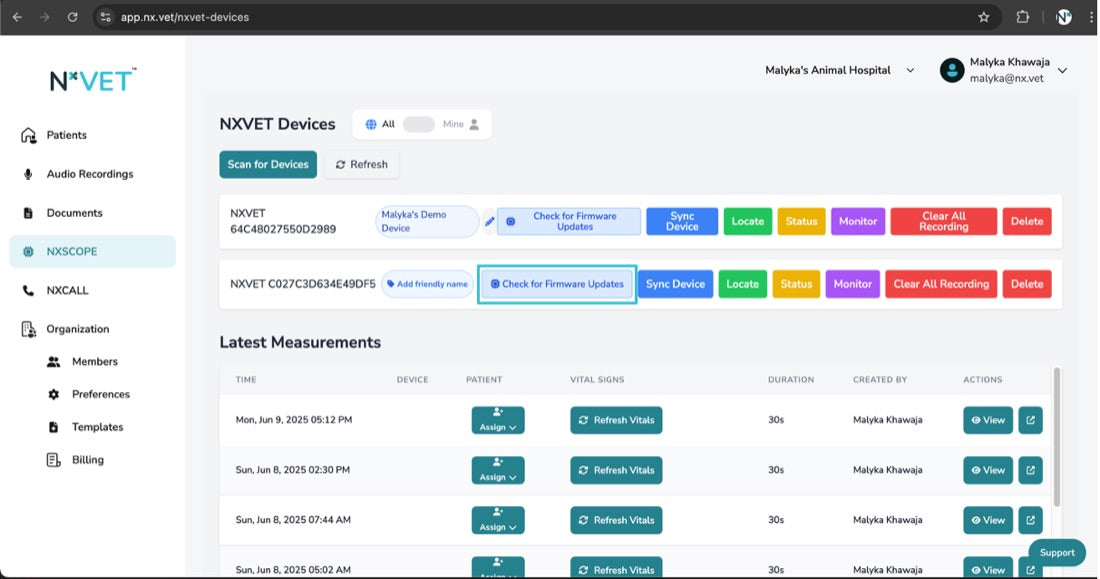
  4. Click Check for Firmware Updates, select your device again and click Pair.
  5. Click Update to load the latest firmware, then pick your device and click Pair.
  6. Stay on the screen until the bar reaches 100%. The device reboots; it takes a minute or two.
  7. Click Clear Data, select your device, click Pair, then OK.
  8. Click Status, select your device and click Pair. You're ready for your first recording.
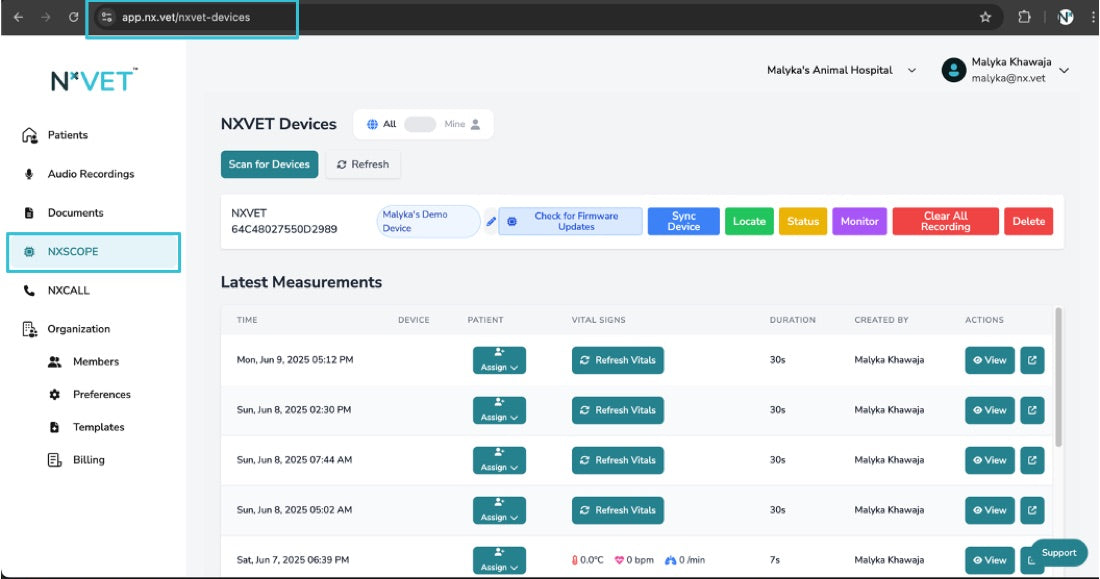
Screenshot of the NxSCOPE page in the NxVET web app
The NxSCOPE page in the web app.
Screenshot of the Scan for Devices button in the web app
Scan for Devices.
Screenshot of the browser Bluetooth dialog listing NxSCOPE devices with a Pair button
Choose your device, then Pair.
Screenshot of the Check for Firmware Updates button in the web app
Check for Firmware Updates.

Record with NxSCOPE

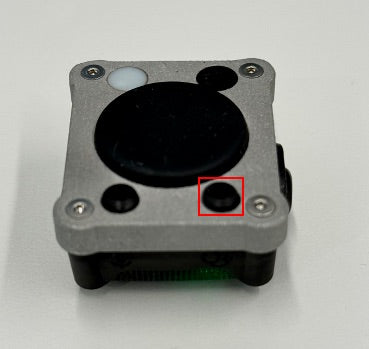
Two buttons on the side, one per mode. NxSCOPE works like a remote control.

Side of NxSCOPE showing its two buttons
The two mode buttons on the side.
NxSCOPE in voice mode with blue LEDs
Voice mode: press the microphone button for about half a second until the blue LEDs pulse. It stops on its own after 60 minutes, or press and hold the button again.
NxSCOPE in vitals mode with a green LED
Vitals mode: press the stethoscope button for about half a second until the green LED flashes. It stops on its own after 30 seconds, or press and hold the button again.

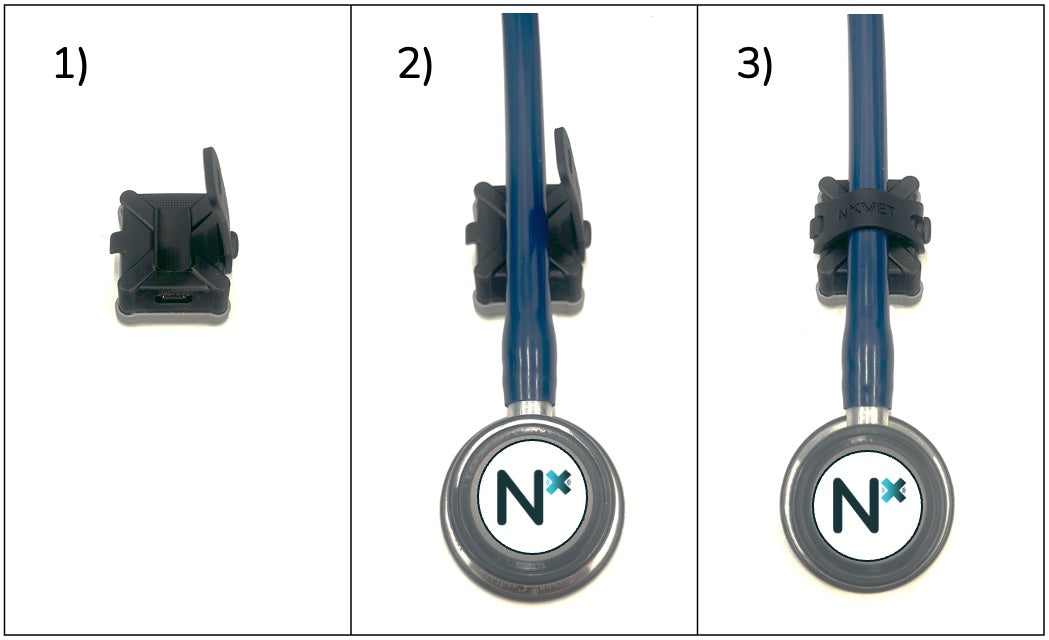
Attach it to your stethoscope

Three steps showing NxSCOPE clipped onto a stethoscope tube
Keep the mic mesh facing up for the clearest voice recordings.

Take a measurement

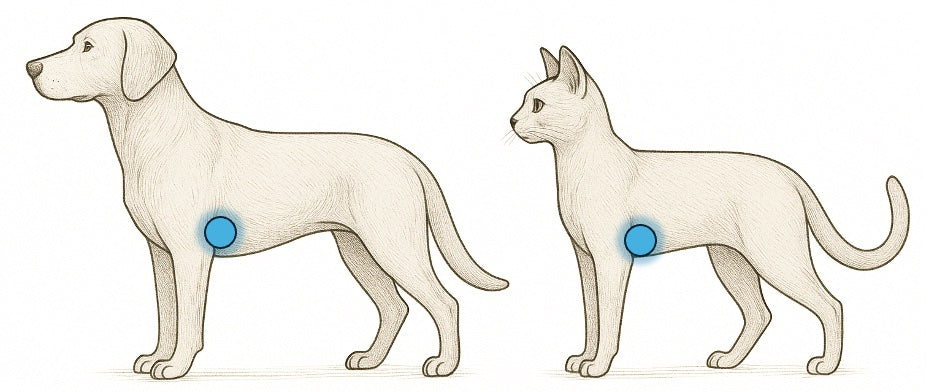
Diagram of a dog and a cat with the measuring point on the left chest wall marked
Where to place NxSCOPE.

With the patient standing naturally, find where the elbow meets the chest wall on the left side. Place the device firmly against the chest one rib space cranial to that point (over the 5th intercostal space) and keep steady pressure.

A hand holding NxSCOPE against the chest of a cat
Firm, steady pressure gives the most accurate readings.

Sync your NxSCOPE data

Recordings sync to your NxVET account, where each one gets an AI SOAP summary and its measurements.

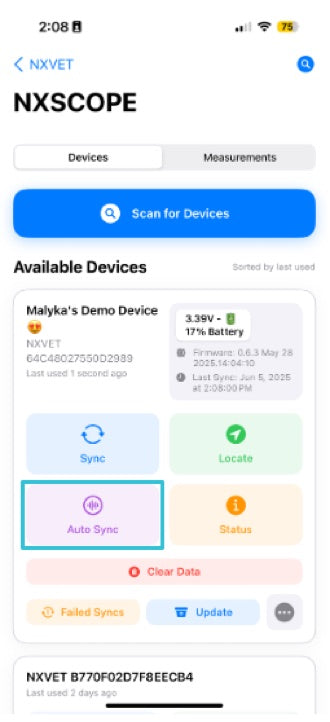
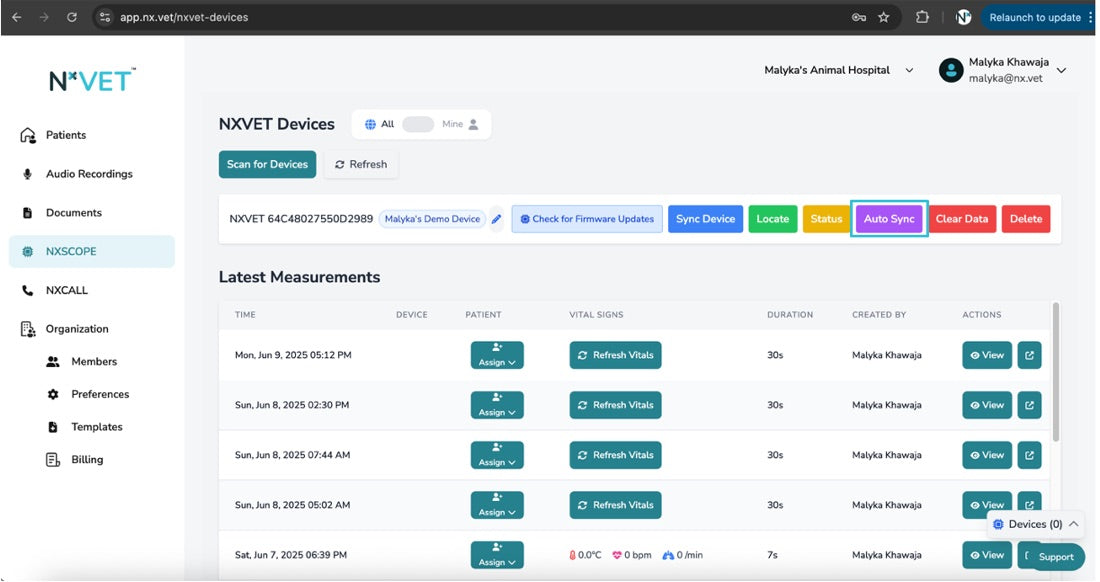
Auto Sync

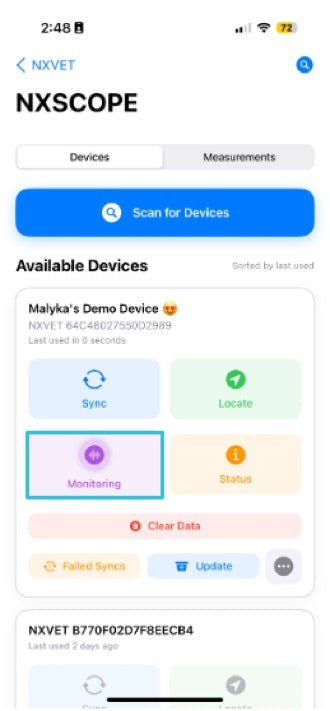
Turn on Auto Sync. While the app shows Monitoring (on a computer: Connected and Monitoring), every measurement syncs on its own as long as you stay within about 10 m. Turn it off with Stop Monitoring.

Manual Sync

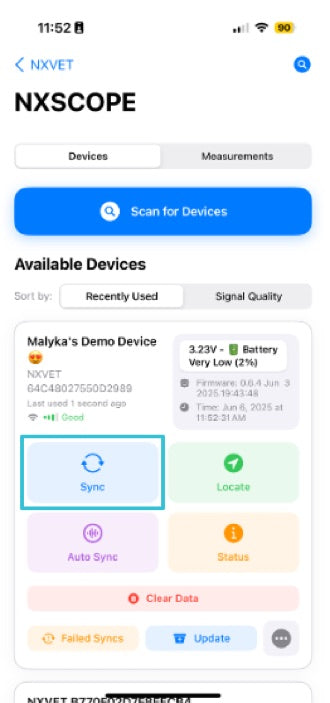
Tap or click Sync to pull every recording from the device at once. The first upload can take 1 to 2 minutes; later syncs take under 10 seconds.

Assign and view

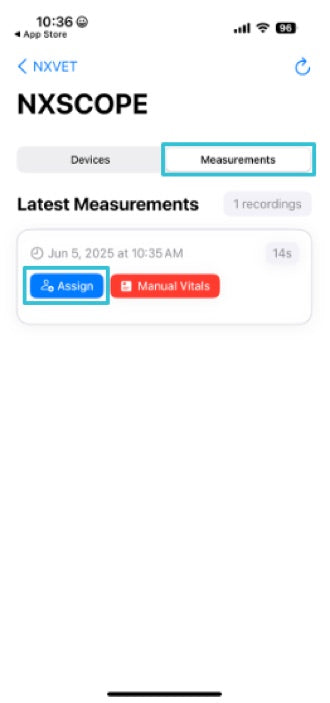
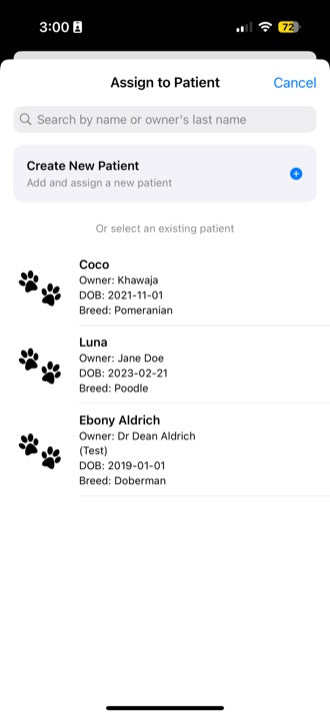
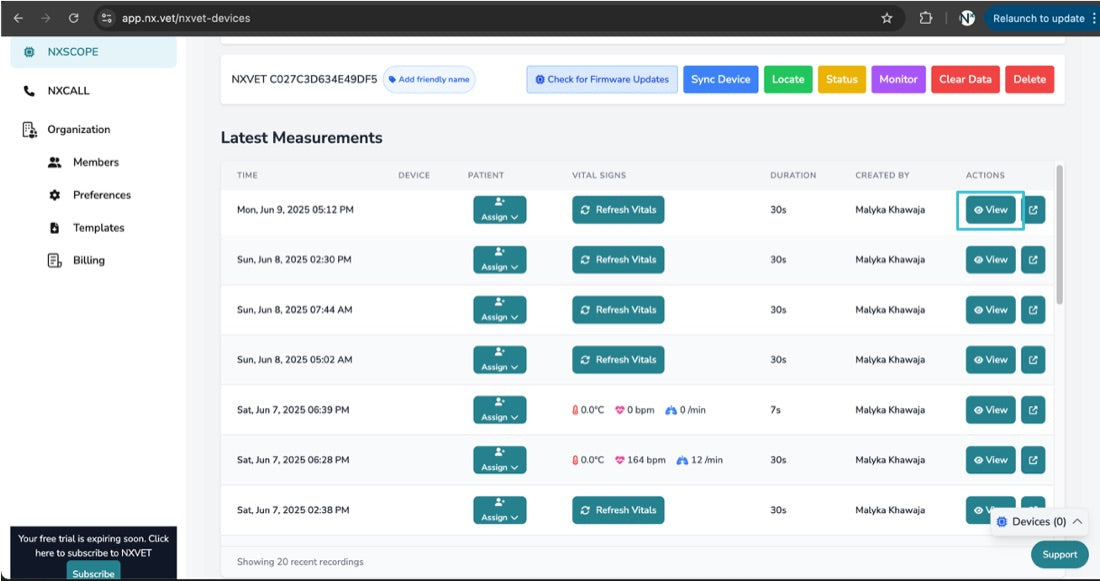
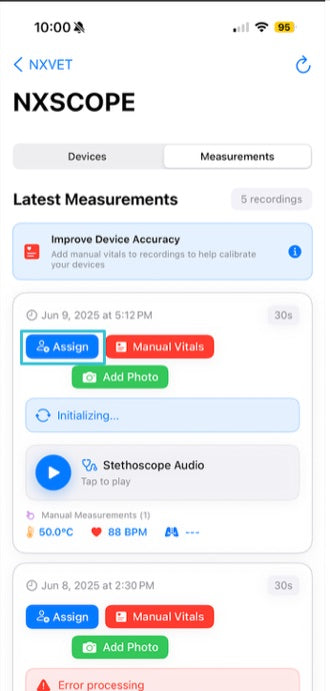
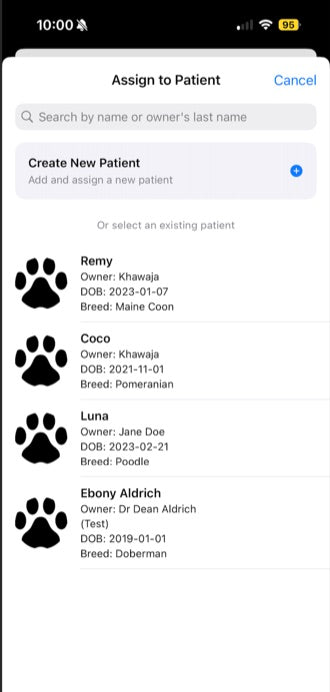
A measurement not linked to a patient yet: Assign it to a patient or create a new one. Open any record (View on a computer) to see its AI SOAP summary and all the measurements.

Phone app: swipe or use the arrows.

  1. Screenshot of the NxVET app: turn on Auto SyncAuto Sync

    Turn on Auto Sync

    Tap Auto Sync on your device card.

  2. Screenshot of the NxVET app: monitoringAuto Sync

    Monitoring

    While the app shows Monitoring, each measurement syncs on its own within about 10 m.

  3. Screenshot of the NxVET app: sync by handManual Sync

    Sync by hand

    Tap Sync to pull every recording at once. The first upload can take 1 to 2 minutes, later ones under 10 seconds.

  4. Screenshot of the NxVET app: assign a recordRecords

    Assign a record

    Not linked to a patient yet? Tap Assign.

  5. Screenshot of the NxVET app: pick the patientRecords

    Pick the patient

    Choose the patient, or create a new one.

  6. Screenshot of the NxVET app: open a recordRecords

    Open a record

    Tap any record to see its AI SOAP summary.

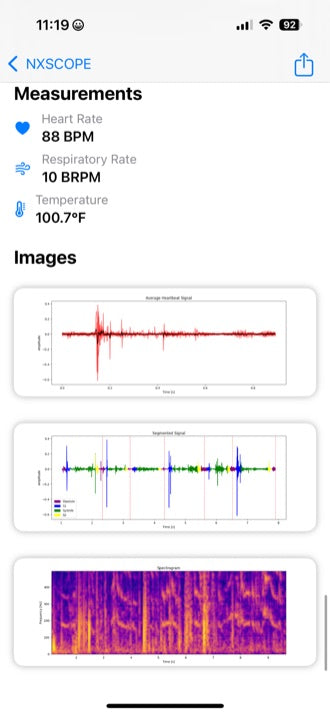
  7. Screenshot of the NxVET app: see the measurementsRecords

    See the measurements

    Heart rate, respiratory rate and temperature, with the signal charts.

Screenshot of the Auto Sync button on the NxSCOPE page of the web app
On a computer: Auto Sync.
Screenshot of the measurements list in the web app with View buttons
On a computer: View opens a record.

Calibrate a new NxSCOPE

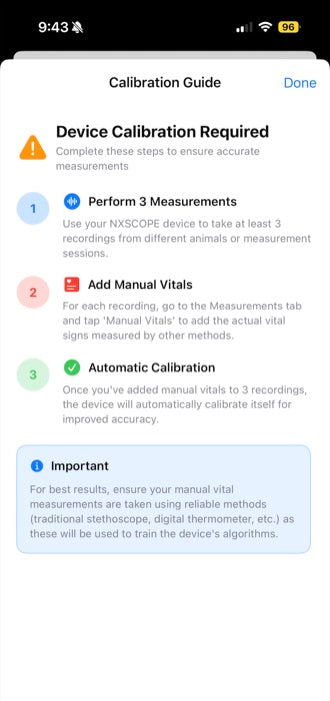
A new device shows a Device Calibration Required banner. It calibrates itself once 3 of its recordings have reference measurements (manual vitals) attached.

How it works

  1. Take at least 3 recordings with NxSCOPE, on different animals or sessions. On your first patient, take a rectal temperature alongside each one.
  2. Add the reference values to each recording with Manual Vitals.
  3. After the third, the banner disappears and the device is ready for accurate measurements on its own.

Use reliable methods for the reference values (digital thermometer, traditional stethoscope): they train the device's algorithms.

The Manual Vitals form

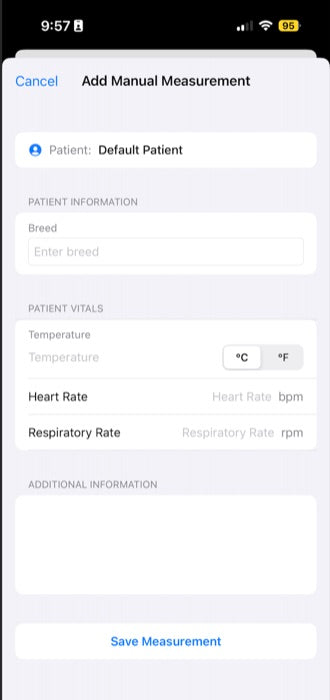
  • Required: species, breed and coat type.
  • At least one of: temperature (°C or °F, plus how it was taken: rectal, ear or other), heart rate (whole bpm), respiratory rate (whole breaths per minute).
  • Optional: additional information or notes.
  • Tap Save Measurement. Manual vitals also keep your medical record complete.

Phone app: swipe or use the arrows.

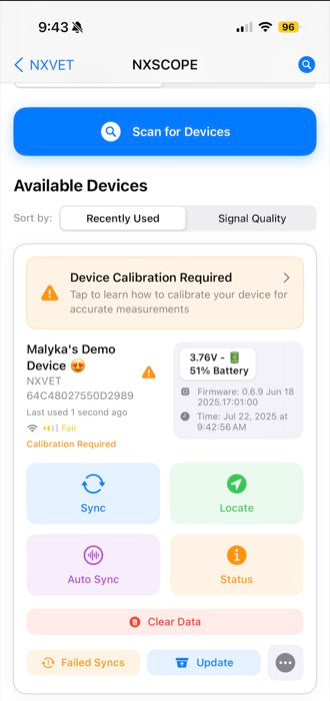
  1. Screenshot of the NxVET app: find your deviceStep 1

    Find your device

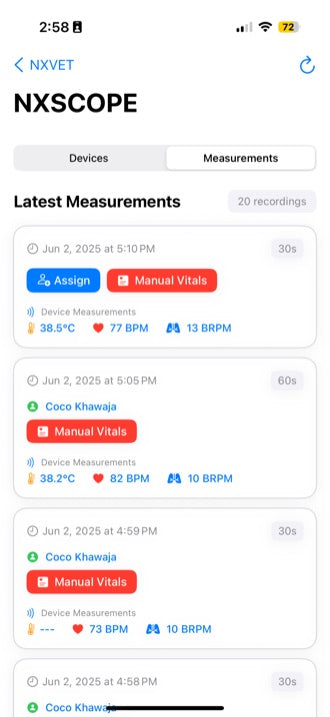
    Go to Devices. A device that needs calibration shows a banner at the top.

  2. Screenshot of the NxVET app: read the bannerStep 1

    Read the banner

    It explains the process: 3 recordings with manual vitals.

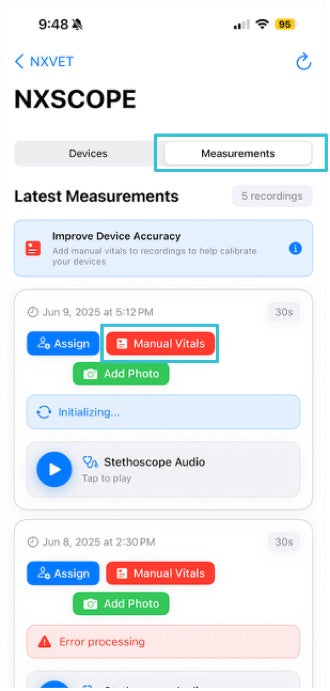
  3. Screenshot of the NxVET app: open Manual VitalsStep 2

    Open Manual Vitals

    In Measurements, under Latest Measurements, tap the Manual Vitals button (heart icon) next to the recording.
  4. Screenshot of the NxVET app: fill in the formStep 3

    Fill in the form

    Species, breed, coat type, then at least one reference value. Tap Save Measurement.

  5. Screenshot of the NxVET app: assign the patientOptional

    Assign the patient

    Link the measurement to an existing patient profile.

  6. Screenshot of the NxVET app: or create a patientOptional

    Or create a patient

    Tap Create New Patient to set up a new record.

NxSCOPE troubleshooting

Only a red light

The battery is below 10%. Charge the device.

My computer doesn't find NxSCOPE
  • Check that the dongle is properly inserted.
  • Check that the drivers were installed (see the dongle guide below).
  • Try a different USB port.
Something is missing from the box

Email support@nx.vet.

I'd rather not install an app

Use the web app at app.nx.vet on a computer.

USB Bluetooth dongle setup (Windows)
  • Requirements: Windows 7, 8, 10 or 11 (32 or 64 bit), 500 MHz CPU or faster, 1 GB RAM, 500 MB free disk space.
  • Prepare: uninstall any third party Bluetooth software. In Device Manager, right click and disable both Generic Bluetooth Adapter and Intel(R) Wireless Bluetooth Adapter. Restart the computer.
  • Install: plug the dongle into a free USB port. Windows installs the basic drivers on its own.
  • Confirm: in Device Manager, under Bluetooth, look for Realtek Bluetooth Adapter.
  • Pair: a Bluetooth icon appears in the system tray. Right click it, choose Add a Bluetooth Device and follow the prompts.
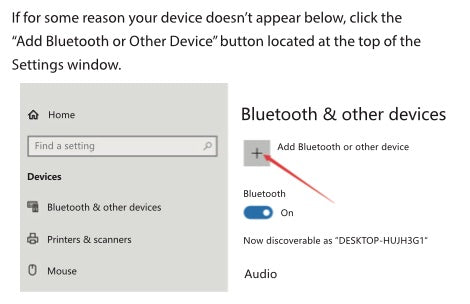
  • Still not found? Go to Settings, Bluetooth & other devices, click Add Bluetooth or Other Device, or use the Add a Device button at the top of the Bluetooth settings window.
Screenshot of Windows installing the Bluetooth driver
Windows installs the driver.
Screenshot of Device Manager showing Realtek Bluetooth Adapter
Realtek Bluetooth Adapter in Device Manager.
Screenshot of the Add a Bluetooth Device option in the system tray
Add a Bluetooth Device.
Screenshot of Windows Bluetooth settings with the Add Bluetooth or Other Device button
Bluetooth & other devices settings.

Still stuck?

Tell us your device and what you see, and we'll help you get it working.